Creating an automated parking attendant
As our company has been growing over the years, the parking lot has gotten more crowded. If it’s full you’ll need to back out and drive to the new building, located down the street. As you are driving you may wonder, ‘Should I head to the second lot straight away, or take my chances with the main parking lot?’
Wouldn’t it be nice if we could pose this question to the voice assistant on our phones and spare us the detour?
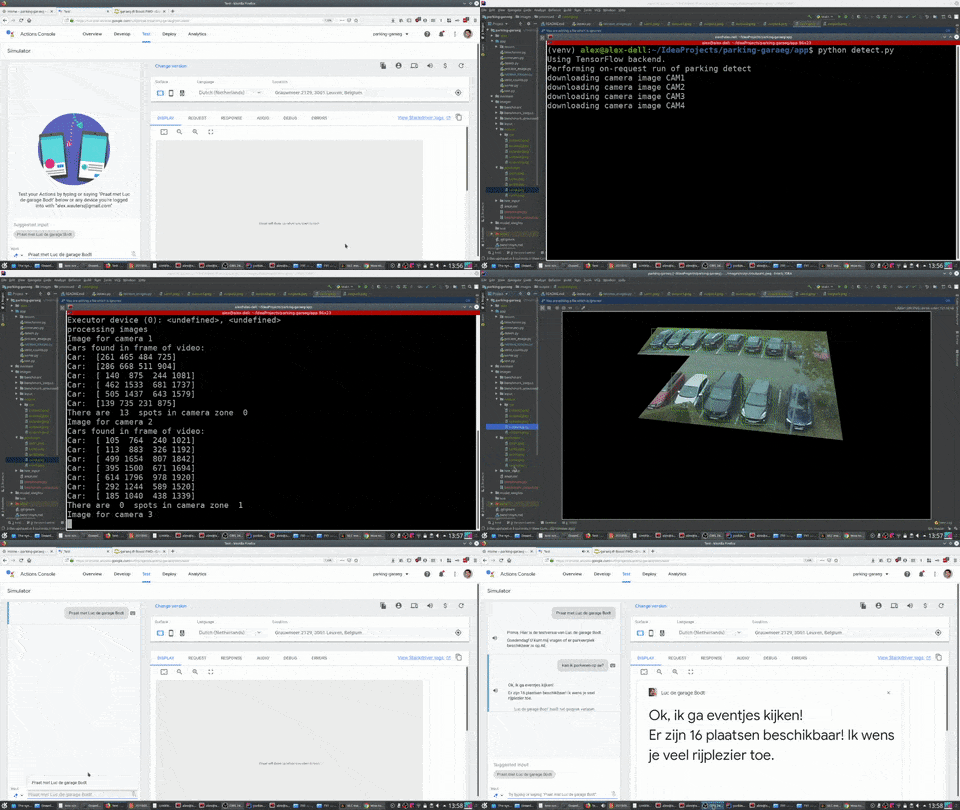
We’ll share with you what we’ve learned in running this solution end-to-end, by using computer vision to analyze camera images of the parking lot.
#1 — Serverless made it painless and cheap to run
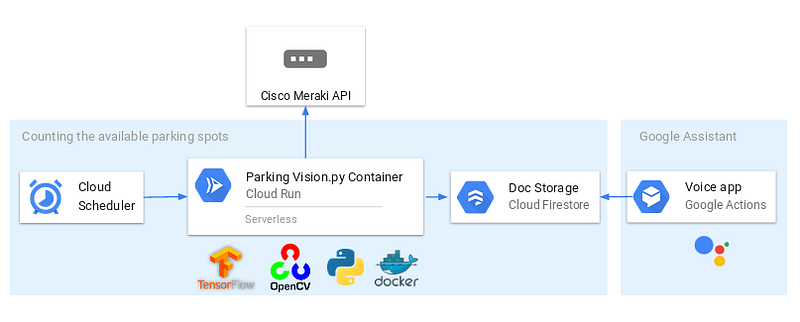
We made a python program which retrieves a snapshot of the parking lot through the camera APIs, runs a computer vision script to remove the irrelevant pieces, count the cars in each zone and send this data to a database (Firestore).
We then created a Google Assistant app which will fetch the count of available parking spots when a user asks for this action via voice or text.
The python script runs in a docker container, which is hosted via Cloud Run. Cloud Run is a new serverless offering from Google which allows you to host docker containers which will run whenever triggered through an API. We set up Cloud Scheduler to ping this URL at regular intervals during business hours. In contrast to other serverless offerings such as Google Functions you have more flexibility in what you can deploy with Cloud Run (just give it a docker image) and have more flexibility in how many resources you allocate and how long the container is allowed to run (a maximum of 15 minutes). If you have an existing Kubernetes environment, you can have Cloud Run run there instead.
Getting the image to run on Cloud Run was quite easy: you upload the image to Google Cloud’s image repository and provide the image and tag name. Our container does seem to require more memory than we expected, so we will optimize the container image in the future.
The end result of this set-up is that we pay just a few eurocents a month, for a set-up where we never had to tweak or update an application.
#2 — The last mile is the longest
We tried several state-of-the-art computer vision models and received decent results straight away. There will be cars that are counted twice or two cars counted as one, but all in all most will be detected just fine when the parking lot isn’t too busy. When the lot is full however, the errors increase, and it’s in those cases that the accuracy is even more important to answer the question: is there at least 1 available spot for me?
Fine-tuning for those final errors is still a work-in-progress. The old idiom that you can get 80% of results for 20% of the effort holds true here. My colleague Oliver Belmans elaborates on these computer vision learnings here:
https://www.d-sides.be/the-parking-vision-project-an-automated-parking-attendant
#3 — Make the script easy to share through docker
There are several libraries required in order to run the car counting program on your machine. Some of these may conflict with versions which you have already installed for other projects. Installing native libraries such as OpenCV or Tensorflow will also require different instructions depending on if you use a Linux, Windows or MacOS laptop. To make it easy to share the program, we use a docker container to build the right environment and run the program from within the docker container.
It will take some time to get your image setup right, as our dockerfile may suggest — but it will save you a lot of trouble down the road. Colleagues don’t waste time trying to get it to work and you are more certain it will keep working later as you update the libraries on your machine or switch to a different computer. As an added advantage, the container will be a good start to run your solution in the cloud (as mentioned in lesson 1).
As it’s a bit cumbersome to re-create the docker image every time after you have made some changes, we load the project and images folder from the local disk in the same container image:
docker run --name=benchmark --mount type=bind,source=/home/alex/parking-garaeg/images,target=/images --mount type=bind,source=/home/alex/parking-garaeg/app,target=/app parking-vision-tester:1.0 python benchmark.py
# 4 —Get some baseline tests and iterate
One of the goals of the experiment was to try out different strategies, learn from them and pick the best. It helps if you get quick feedback on whether an approach performs better or worse than the current best.
To accomplish this, you can run the same program with a different invocation argument (benchmark.py) which will run the algorithm on a test set of images instead of the main script which goes on to retrieve the camera images. To keep it simple, we collected a couple of camera images for each zone, and noted in the filename which zone it applies to and how many cars are present in the image (cam1–5-….jpeg). The benchmark script loops over all the images in the folder, compares the generated count versus the one found in the filename and spits out the total difference. It’s simple but effective.
There is room to improve still, as our program will skip over some cars if they are too close together or behind a tree.
# 5 — Low resolution images = lower results
Although the cameras record video in high quality, the snapshots made available through the API only return images of mere ~140 kb in size. Compared to high-definition images this makes quite a difference for computer vision scripts, and we have had to adjust our approaches. If you are looking at a certain camera to apply this script to, make sure you check out the quality of the snapshots first. Even on low resolution images the results are interesting, but increasing the quality will undoubtedly improve the results for near real-time detection.
Cisco does offer object detection for the historic views of the camera, which does not suit our use case where we would like to know how many cars are stationed in each zone right now.
That was it, hope you enjoyed this post. The automated parking vision is one of the running experiments within our garage at AE, where we try out different emerging technologies and machine learning algorithms to improve a running model. Even though it’s improving along the way I find the best way to completely avoid parking anxiety is to bike to work!
Make sure you check out Oliver’s post for more elaboration on the computer vision algorithm. If you need some help to get started with emerging technologies at your company, do reach out.
Get notified of new posts by subscribing to the RSS feed or following me on LinkedIn.

